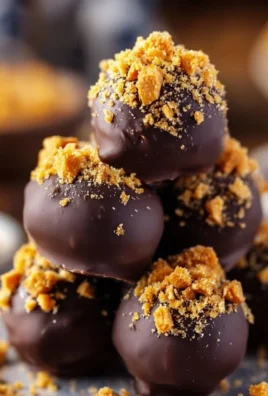
Quick and Easy Butterfinger Balls
When the craving for something sweet hits, nothing satisfies quite like a bite-sized treat that is crispy, creamy, and utterly indulgent. Enter Quick and Easy Butterfinger Balls—a delightful dessert that has a perfect balance of peanut butter flavor, crunchy texture, and a luscious chocolate coating. These little bites of happiness are not only a treat to the taste buds, but they also bring back wonderful memories of family gatherings and sharing special moments with loved ones.
I’ll let you in on a fun fact: Did you know that Butterfinger was originally created in 1923 and became a favorite for many families? These Butterfinger Balls capture that nostalgic goodness in a simple recipe that is perfect for both novices and seasoned bakers alike. They remind me of my popular no-bake cookie recipe; while both are delicious, the Butterfinger Balls are a little more indulgent, making them ideal for special occasions or simply when you need a pick-me-up.
Ready to dive in? Let’s explore how to make these heavenly treats that everyone will love!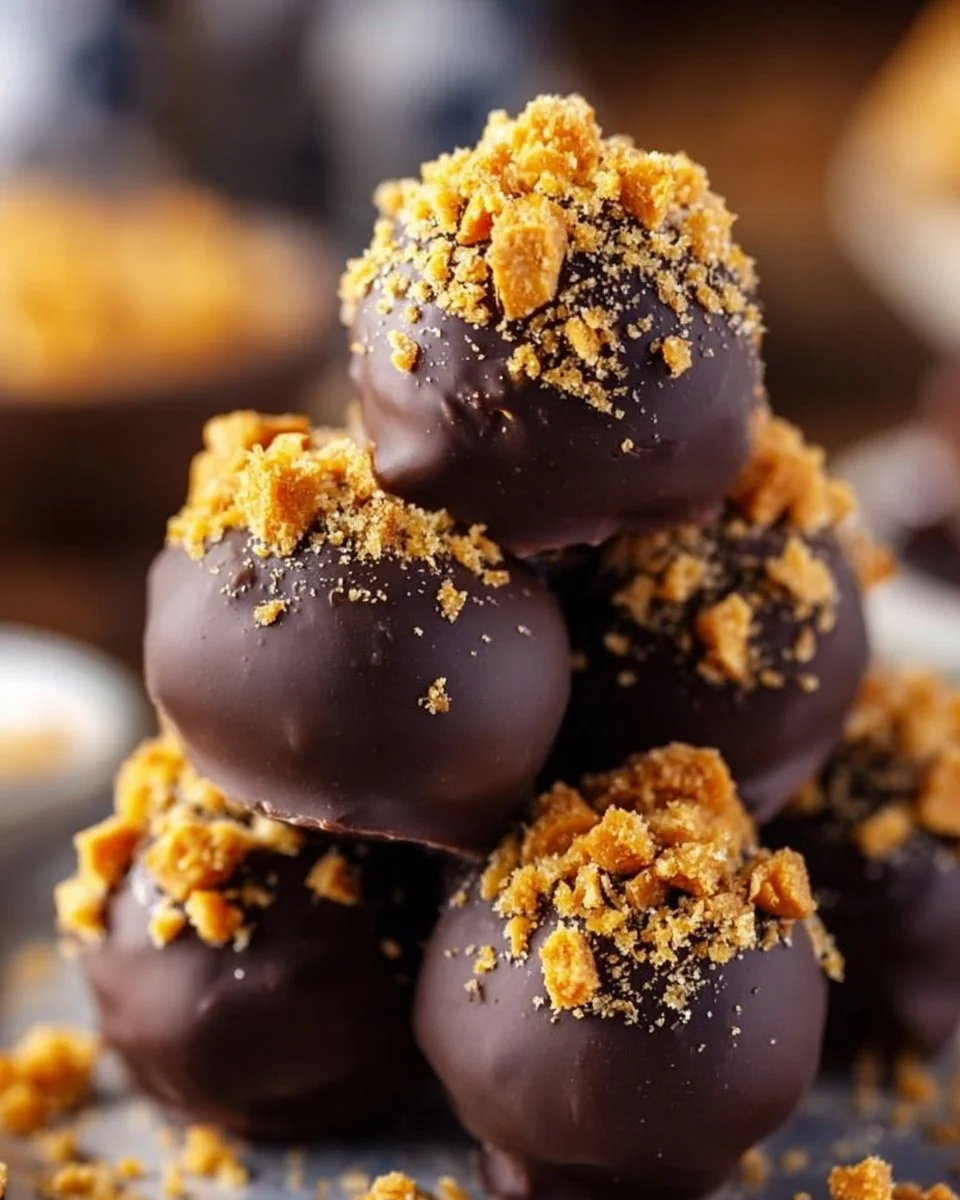
What is Quick and Easy Butterfinger Balls?
So, what exactly are Quick and Easy Butterfinger Balls? Imagine a creamy, dreamy combination of peanut butter and crushed cookies, all rolled into a perfect bite-sized ball and coated in chocolate. The name might make you wonder if there’s a secret ingredient involved—perhaps magic? Well, the secret is simply the delightful crunchiness reminiscent of a real Butterfinger candy bar, but in an easy-to-make ball form. And let’s face it, we all know that the way to a man’s heart is through his stomach! So, ladies and gentlemen, if you’re looking to impress someone, you’ve hit the jackpot with this recipe. Gather your ingredients and let’s get started with these delectable treats!
Why You’ll Love This Quick and Easy Butterfinger Balls
There are so many reasons to love Quick and Easy Butterfinger Balls! First off, these little gems are the ultimate indulgent treat. With their crispy texture and creamy peanut butter center, you get a burst of flavor that will leave you wanting more. Secondly, by making these at home, you can save some money compared to buying store-bought snacks, and let’s not forget the satisfaction of creating something delicious from scratch!
To make them even more interesting, consider adding a variety of toppings! Imagine rolling them in crushed nuts or drizzling them with melted chocolate for an extra indulgence. You might even want to compare them to your favorite truffles—they’re just as rich but come together in a flash. Are you ready to treat yourself and your family to these delights? Let’s jump into the recipe!
How to Make Quick and Easy Butterfinger Balls
Quick Overview
The beauty of Quick and Easy Butterfinger Balls lies in their simplicity. These decadent little bites are incredibly easy to make, perfect for a quick dessert or snacking option. With the creamy peanut butter flavor and a satisfying crunch, you can whip these up in just about 30 minutes.
Key Ingredients for Quick and Easy Butterfinger Balls
Here’s what you’ll need to create your very own Quick and Easy Butterfinger Balls:
- 1 cup creamy peanut butter (ensure it’s Halal-certified)
- 1 cup confectioners’ sugar
- 2 cups crushed vanilla wafers (or any Halal-friendly cookie)
- 1 cup milk chocolate chips (Halal-certified, for melting)
- 1 tablespoon vegetable oil (optional, for smoother melting of chocolate)
Step-by-Step Instructions
-
Mix the Base: In a medium-sized bowl, combine the creamy peanut butter and confectioners’ sugar. Use a spatula or a wooden spoon to mix until smooth. It should be thick but manageable.
-
Add the Cookies: Gradually stir in the crushed vanilla wafers. Keep mixing until the ingredients come together and form a dough-like consistency. It should not be sticky.
-
Form the Balls: With clean hands, scoop and roll the mixture into small balls (about 1 inch in diameter). Place them on a baking sheet lined with parchment paper.
-
Chill: Refrigerate the balls for about 15-20 minutes to firm up. This will make them easier to coat with chocolate.
-
Melt the Chocolate: While the balls chill, melt the milk chocolate chips and optional vegetable oil in a microwave-safe bowl, heating in 30-second intervals and stirring until smooth.
-
Coat the Balls: Once the peanut butter balls are firm, dip each one into the melted chocolate, using a fork to lift them out. Make sure they’re evenly coated and let the excess chocolate drip off.
-
Set: Place the chocolate-covered balls back onto the parchment-lined baking sheet for the chocolate to set. If you have extra melted chocolate, feel free to drizzle over the top for presentation.
-
Enjoy: Let the balls sit at room temperature or pop them back in the fridge for a quicker set. They are now ready to be enjoyed, or stored for later!
Top Tips for Perfecting Quick and Easy Butterfinger Balls
-
Substitutions: If you want to try a healthier version, consider using natural peanut butter or almond butter in place of creamy peanut butter, and sugar alternatives like honey or coconut sugar.
-
Timing: Keep an eye on the chocolate when melting, as overheating can cause it to seize.
-
Avoiding Common Mistakes: Make sure the balls are firm enough before dipping them in chocolate; if they’re too soft, they may fall apart.
Storing and Reheating Tips
To ensure your Quick and Easy Butterfinger Balls stay fresh longer, store them in an airtight container in the refrigerator. They should last up to one week, making them a quick grab-and-go treat! You can also freeze them for up to three months—just make sure to separate them with parchment paper to prevent sticking. To enjoy them after freezing, simply let them thaw in the fridge for a few hours. This way, you can savor the same delicious taste and texture as when they were first made.
Now that you have all the insights and tips to make the perfect Quick and Easy Butterfinger Balls, why not gather your family and friends to indulge in this delightful treat? Perfect for any occasion or simply a cozy winter evening, these buttery, chocolatey bites are bound to bring smiles all around! Enjoy!
A Delightful Dessert
Description
Quick and Easy Butterfinger Balls are crispy, creamy, and coated with luscious chocolate, making them a perfect treat for any occasion.
Ingredients
Instructions
- In a medium-sized bowl, combine the creamy peanut butter and confectioners’ sugar until smooth.
- Gradually stir in the crushed vanilla wafers until a dough-like consistency forms.
- With clean hands, scoop and roll the mixture into small balls (about 1 inch in diameter).
- Refrigerate the balls for about 15-20 minutes to firm up.
- Melt the chocolate chips and optional vegetable oil in a microwave-safe bowl in 30-second intervals.
- Dip each ball into the melted chocolate, ensuring even coating.
- Place the coated balls back onto the parchment-lined baking sheet to set.
- Let the balls sit at room temperature or refrigerate until set.
Notes
- Store in an airtight container in the refrigerator for up to one week or freeze for up to three months.
Leave a Comment